Coordinate System |
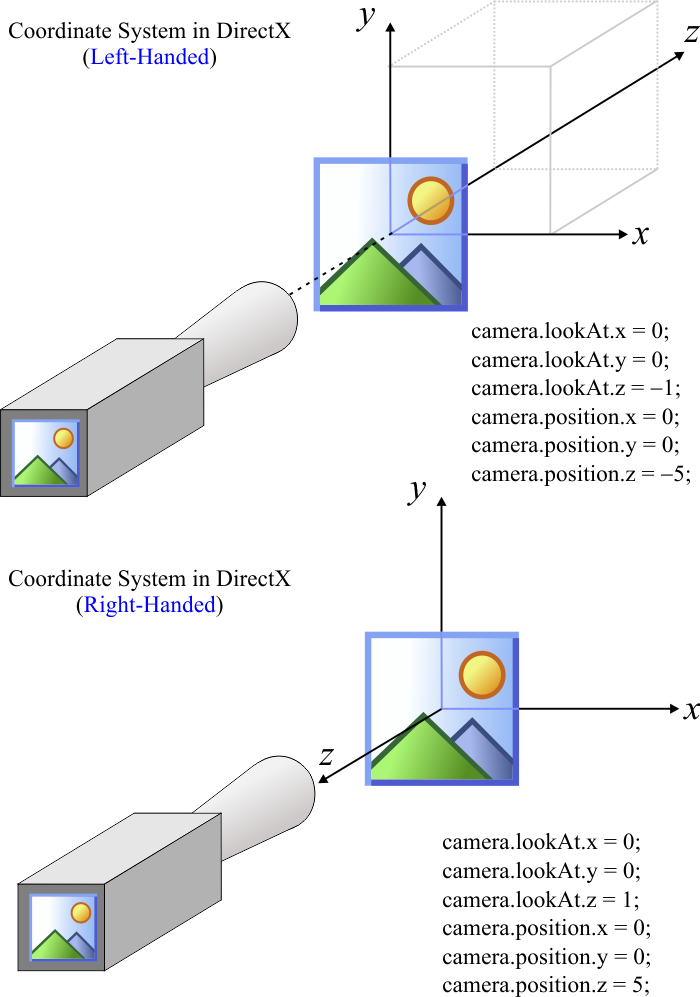
| DirectX uses a left-handed coordinate system or a right-handed coordinate system as shown below. In this figure, the camera is located over the Z axis, anything behind the camera cannot be seen. Understanding the coordinate system is very important to solve problems in your program. Most programs here will use a left-handed coordinate system. DirectX usa un sistema de coordenadas de mano izquierda o un sistema de coordenadas de mano derecha como se muestra debajo. En la figura, la cámara está ubicada sobre el eje Z, cualquier objeto atrás de la cámara no se puede ver. Entender el sistema de coordinadas es muy importante para resolver problemas en su programa. La mayoría de los programas aquí usan un sistema de coordenadas de mano izquierda. |
Vector |
| DirectX provides the DirectX::XMVECTOR class to store vectors in a 3D space. DirectX propociona la clase DirectX::XMVECTOR para almacenar vectores en un espacio 3D. |
Matrix |
| Most 3D operations require the fast manipulations of matrices. DirectX provides several structures and functions to manipulate matrices. One common structure to store a matrix is DirectX::XMMATRIX. Typically, a DirectX project must have at least three matrices: the view matrix, the projection matrix, and the world matrix. The equation below shows how to compute the screen data Screen data = (World Matrix) × (View Matrix) × (Projection Matrix) × (Object data) La mayoría de las operaciones de 3D requieren la manipulación rápida de matrices. DirectX proporciona varias estructuras y funciones para manipular matrices. Una estructura común para almacenar una matriz es DirectX::XMMATRIX. Típicamente, un proyecto de DirectX debe tener al menos tres matrices: la matriz de vista, la matriz de proyección, y la matriz de mundo. La ecuación de abajo muestra cómo calcular los datos de la pantalla Screen data = (World Matrix) × (View Matrix) × (Projection Matrix) × (Object data) |
View Matrix |
The view matrix is used to specify the position and direction of the eye that is looking at the objects in the scene. You must use the DirectX::XMMatrixLookAtLH function to create a view matrix (the first parameter is the matrix where the output will be stored). In order to set the view, you need:
La matriz de vista es usada para especificar la posición y la dirección del ojo que está observando los objetos de la escena. Usted debe usar la función DirectX::XMMatrixLookAtLH para crear una matriz de vista (el primer parámetro es la matriz dónde se almacenará la salida.) A fin de usar la vista, usted necesita
|
| Example.cpp |
| void Example::InitDevice() { . . . //_____________________________________________________________ View Matrix // Set the eye point, a point to look at, and a direction for which way is up. // The eye is five units back along the z-axis and up three units, look at the origin, and define "up" to be in the y-direction. DirectX::XMVECTOR eye =DirectX::XMVectorSet(0.0f, 3.0f, -5.0f, 0.0f); DirectX::XMVECTOR lookAt = DirectX::XMVectorSet(0.0f, 0.0f, 1.0f, 0.0f); DirectX::XMVECTOR up = DirectX::XMVectorSet(0.0f, 1.0f, 0.0f, 0.0f); view = DirectX::XMMatrixLookAtLH (eye, lookAt, up); // Left-Handed //view = DirectX::XMMatrixLookAtRH (eye, lookAt, up); // Right-Handed . . . } bool Example::RenderScene() { . . . // Use the View Matrix: view . . . } |
Projection Matrix |
| The projection matrix sets up a perspective transform which transforms geometry from 3D view space to a 2D viewport space, with a perspective making objects smaller in the distance. In order to set the projection matrix you need to call DirectX::XMMatrixPerspectiveFovLH function. The code shown below illustrates how to create a projection matrix. La matriz de proyección configura la transformación de perspectiva la cual transforma la geometría desde un espacio de vista en 3D a un espacio 2D, con una perspectiva haciendo los objetos distantes más pequeños. A fin de fijar la matriz de proyección usted necesita llamar la función DirectX::XMMatrixPerspectiveFovLH. El código de abajo ilustra cómo crear la matriz de proyección. |
| Example.cpp |
| void Example::InitDevice() { . . . projection = DirectX::XMMatrixPerspectiveFovLH(DirectX::XM_PI / 4, 1.0f, 1.0f, 100.0f); // Left-Handed //projection = DirectX::XMMatrixPerspectiveFovRH(DirectX::XM_PI / 4, 1.0f, 1.0f, 100.0f); // Right-Handed } bool Example::RenderScene() { . . . // Use the Projection Matrix: projection . . . } |
World Matrix |
| The world matrix allows to translate, rotate or scale an object as shown in the table. La matriz de mundo permite desplazar, rotar o escalar un objeto cómo se muestra en la tabla. |
| Operation | Function |
| Translate | DirectX::XMMatrixTranslation |
| Rotate X | DirectX::XMMatrixRotationX |
| Rotate Y | DirectX::XMMatrixRotationY |
| Rotate Z | DirectX::XMMatrixRotationZ |
| Rotate XYZ | DirectX::XMMatrixRotationRollPitchYaw |
| Scale | DirectX::XMMatrixScaling |
| Affine transformation | DirectX::XMMatrixAffineTransformation |
| Problem 1 |
| Open the BasicX project created previously. We will use the transformation matrix world to rotate the triangle. Abra el proyecto BasicX previamente creado. Usaremos la matriz de transformación world para rotar el triángulo. |
| Step A |
| Add a float variable to store the angle around the axis y of the triangle by editing the Triangle.h file. To illustrate how translation can be used, we translate the triangle a little to the top. Agregue una variable float para almacenar el ángulo alrededor del eje y del triángulo editando el archivo Triangle.h. Para ilustrar cómo se puede usar la translación, desplazamos el triángulo un poco hacia arriba. |
| Triangle.h |
| //____________________________________________________________ Triangle.h #pragma once class Triangle : public DX11::Object3D { float angleY = 0.0f; bool OnCreateScene(DX11::Engine& engine); . . . }; |
| Step B |
| Edite the Triangle.cpp file. When done, compile and run the program. You should be able to rotate the triangle pressing F1 or F2. To improve performance, the back of the triangle is no drawn. Editando el archivo Triangle.cpp. Cuando termine, compile y ejecute el programa. Usted debe poder rotar el triángulo presionado F1 or F2. Para mejorar el desempeño, la parte trasera del triángulo no se dibuja. |
| Triangle.cpp |
| . . . void Triangle::OnUpdate(DX11::Engine& engine, float sec, float deltaSec) { //________________________________________________________ 1. Translate DirectX::XMMATRIX translation; translation = DirectX::XMMatrixTranslation(0.0f, 1.0f, 0.0f); //________________________________________________________ 2. Rotate DirectX::XMMATRIX rotation; if (engine.keyboard[VK_F1]) angleY -= (0.5f*deltaSec); if (engine.keyboard[VK_F2]) angleY += (0.5f*deltaSec); rotation = DirectX::XMMatrixRotationY(angleY); //________________________________________________________ 3. Compute world matrix world = DirectX::XMMatrixMultiply(rotation, translation); } . . . |
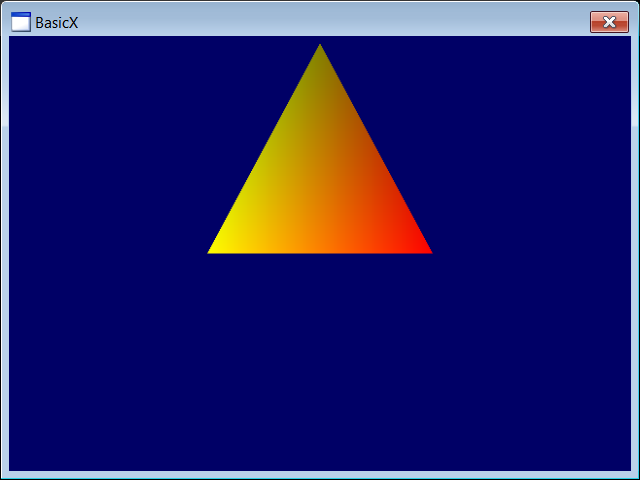
| Problem 2 |
| Open the BasicX project of the previous problem and change the color of the triangle to yellow and red as shown. Observe that the triangle has two shades of yellow. Abra el proyecto BasicX del problema anterior y cambie el color del triángulo a amarillo y rojo como se muestra. Observe que el triángulo tiene dos tonos de amarillo. |