The Tab Control |
| The Tab Control has a collection of items. Each item is a Tab has an index, a text, an image and a numeric value. The index is used to set the position of the item (the tab) in the control. The text is used so that the user can understand the information in the control. The image is optional. The numeric value can be used internally for the program. El control de Tab tiene una colección de artículos. Cada artículo es una pestaña con un índice, un texto, una imagen, y un valor numérico. El índice es usado para establecer la posición del artículo (la pestaña) en el control. El texto es usado para que el usuario pueda entender la información en el control. La imagen es opcional. El valor numérico puede ser usado internamente por el programa. |
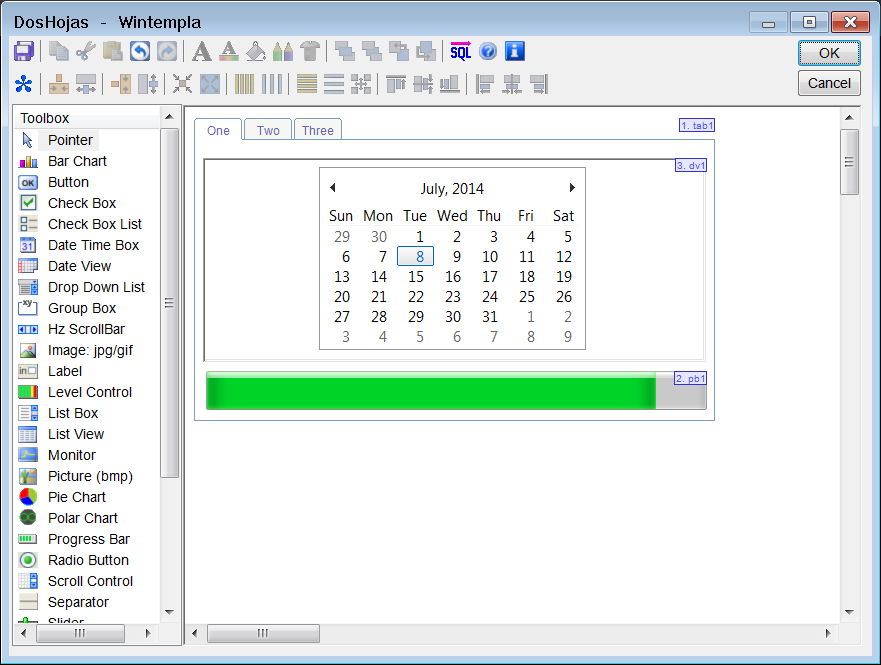
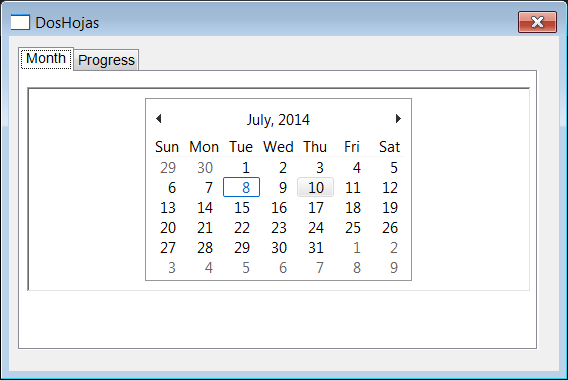
| Problem 1 |
| Create a program called DosHojas to show a Month View or a Progress Bar. After creating the project, insert a tab control. Then, insert a Month View control inside the area of the Tab control. Finally, insert a Progress Bar as shown below. Cree un programa llamado DosHojas para mostrar una Vista de Mes o una Barra de Progreso. Después de crear el proyecto, inserte un control de Tab. Entonces, inserte un control de Month View dentro del área del control de Tab. Finalmene, inserte un control de Progress Bar como se muestra debajo. |

| MyOption.cpp |
| void DosHojas::Window_Open(Win::Event& e) { //________________________________________________________ tab1 tab1.Items.Add(0, L"Month"); tab1.Items.Add(1, L"Progress"); //________________________________________________________ dv1 dv1.SelectedDate = Sys::Time::Now().AddDays(2); //________________________________________________________ pb1 pb1.SetRange(1, 50); pb1.Position = 25; pb1.StepIt();// Move it to 26 //________________________________________________________ Set the Month tab as the initial tab1.SelectedIndex = 0; dv1.Visible = true; pb1.Visible = false; } void DosHojas::tab1_SelChange(Win::Event& e) { switch(tab1.SelectedIndex) { case 0: dv1.Visible = true; pb1.Visible = false; break; case 1: dv1.Visible = false; pb1.Visible = true; break; } } |
| Problem 2 |
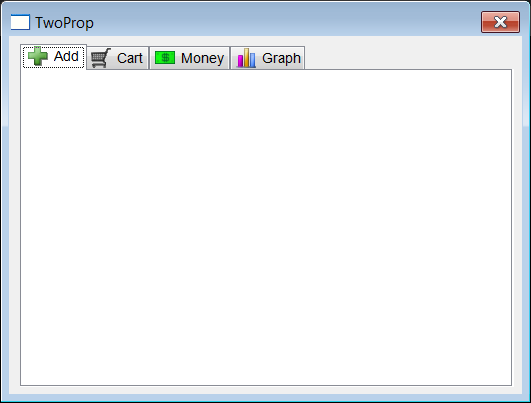
| Create a Wintempla Dialog application with toolbar icons called TwoProp . Wintempla will generate several common icons; you can explore these icons using the Resource View in Microsoft Visual Studio. After creating the project, insert a tab control. Cree una aplicación de Diálogo de Wintempla con iconos para barra de herramientas llamada TwoProp. Wintempla generará varios iconos comunes; usted puede explorar estos iconos usando la Vista de Recursos en Microsoft Visual Studio. Después de crear el proyecto, inserte un control de tab. |
| TwoProp.h |
| #pragma once //______________________________________ TwoProp.h #include "Resource.h" class TwoProp : public Win::Dialog { public: TwoProp() { } ~TwoProp() { } Win::ImageList imageList; protected: ... }; |
| TwoProp.cpp |
| ... void TwoProp::Window_Open(Win::Event& e) { //______________________________ Four images of size 20 x 20 imageList.Create(20, 20, 4); imageList.AddIcon(hInstance, IDI_ADD); imageList.AddIcon(hInstance, IDI_CART); imageList.AddIcon(hInstance, IDI_MONEY); imageList.AddIcon(hInstance, IDI_GRAPH); tab1.SetImageList(imageList); //______________________________ tab1 tab1.Items.Add(0, 0, L"Add"); // index, image, text tab1.Items.Add(1, 1, L"Cart"); tab1.Items.Add(2, 2, L"Money"); tab1.Items.Add(3, 3, L"Graph"); } |
Tab Item |
A tab control has a collection of tab items. Each item has:
Un control de tab tiene una colección de pestañas. Cada pestaña tiene:
|
A GUI Element over another GUI Element |
| Be careful when placing GUI Elements over other GUI Elements, it is possible your program will have problems to properly display both GUI Elements. As the Paint Event (WM_PAINT) is not synchronous, it is very likely that sometimes one GUI Element will be shown, and sometimes the other GUI Element will be shown. To fix this problem, one GUI Element must be that parent of the other GUI Element. Additionally, the parent should have the property Clip Children. Thus, if you would like to place textboxes and buttons over a Tab control, the Tab control must be the parent of the textboxes and the buttons. Additionally, the Tab control must have the property Clip Children active. Specifically, you must create manually the textboxes and buttons using the Create method passing the parent hWnd the Tab control as shown. Tenga cuidado cuando coloque Elementos GUI encima de otros Elementos GUI, es posible que su programa tendrá problemas para mostrar ambos Elementos GUI. Como el Evento Paint (WM_PAINT) no es síncrono, es muy probable que a veces un Elemento GUI será mostrado, y a veces el otro Elemento GUI será mostrado. Para corregir este problema, un Elemento GUI debe ser el padre del otro Elemento GUI. Adicionalmente, el padre debe tener la propiedad de Clip Children. Así, si usted quisiera colocar cajas de texto y botones sobre un control de Tab, el control de Tab debe ser el padre de las cajas de texto y los botones. Adicionalmente, el control de Tab debe tener la propiedad de Clip Children activa. Específicamente, usted debe crear manualmente las cajas de texto y los botones usando el método Create pasando en el hWnd del padre el control de Tab como se muestra. |
| IncorrectProgram.h |
| #pragma once //_____________________________________________ IncorrectProgram.h #include "resource.h" class IncorrectProgram: public Win::Dialog { public: IncorrectProgram() { } ~IncorrectProgram() { } private: //______ Wintempla GUI manager section begin: DO NOT EDIT AFTER THIS LINE Win::Tab tabRow; Win::Textbox tbxEdit; protected: ... //_________________________________________________ void InitializeGui() { tabRow.Create(WS_EX_CLIENTEDGE, NULL, WS_CHILD | WS_TABSTOP | WS_VISIBLE, ...); tbxEdit.Create(..., 7, 10, 112, 25, hWnd, 1000); } }; |
| CorrectProgram.h |
| #pragma once //_____________________________________________ CorrectProgram.h #include "resource.h" class IncorrectProgram: public Win::Dialog { public: CorrectProgram() { } ~CorrectProgram() { } private: //______ Wintempla GUI manager section begin: DO NOT EDIT AFTER THIS LINE Win::Tab tabRow; Win::Textbox tbxEdit; protected: ... //_________________________________________________ void InitializeGui() { tabRow.Create(WS_EX_CLIENTEDGE, NULL, WS_CHILD | WS_CLIPCHILDREN | WS_TABSTOP | WS_VISIBLE, ...); //tbxEdit.Create(..., 7, 10, 112, 25, hWnd, 1000); } }; |
| CorrectProgram.cpp |
void CorrectProgram::Window_Open(Win::Event& e) { tbxEdit.Create(..., 7, 10, 112, 25, tabRow.GetHWND(), 1000); } |
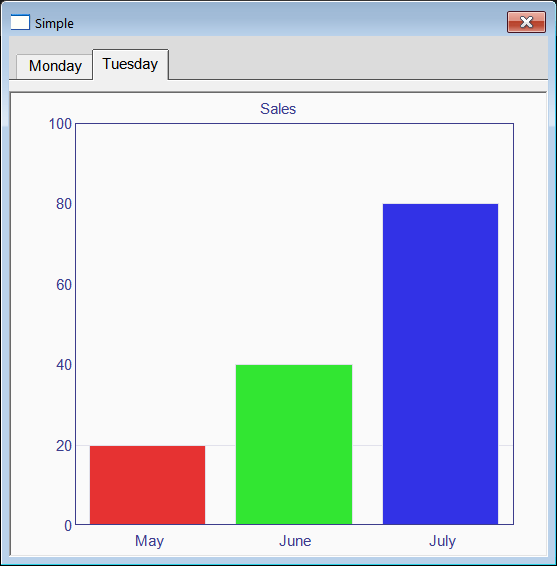
| Problem 3 |
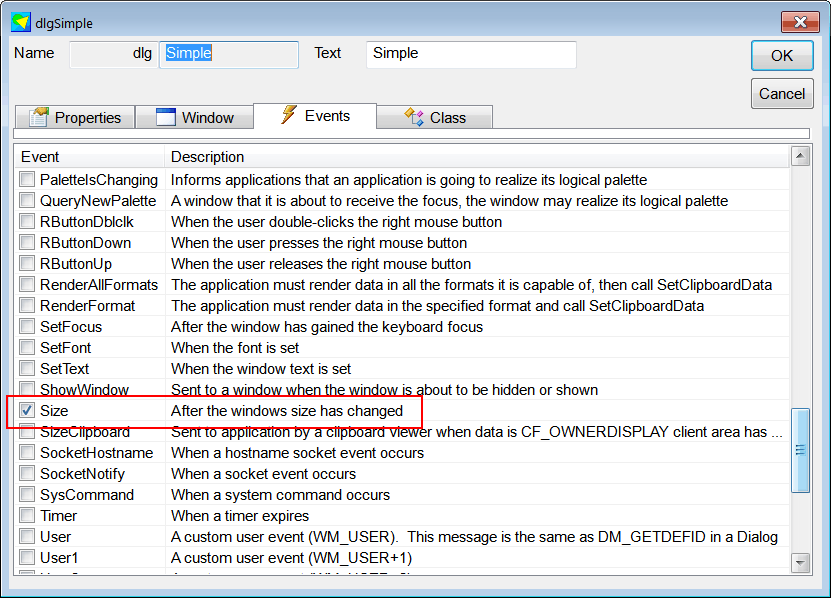
| Create a Wintempla Dialog Application called Simple to test the TabHeader control. Insert a TabHeder control and a BarChar control. Click in the editor anywhere outside any control; check the Size event and the properties: Clip Child Windows and Resizing Border. Cree una Aplicación de Diálogo con Wintempla llamada Simple para probar el control de TabHeader. Inserte un control de TabHeader y un control de Barchar. Haga clic en el editor en cualquier lugar fuera de los controles; cheque el evento de Size y las propiedades de: Clip Child Windows y Resizing Border. |
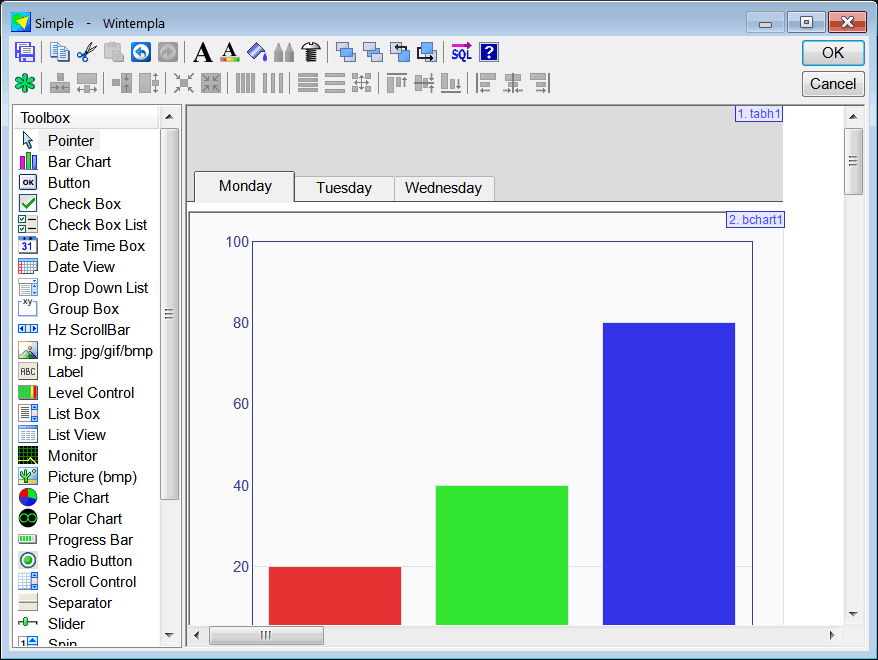

| Simple.cpp |
| ... void Simple::Window_Open(Win::Event& e) { //________________________________________________________ tabh1 tabh1.AddItem(L"Monday"); tabh1.AddItem(L"Tuesday"); //________________________________________________________ bchart1 bchart1.Bars.Add(L"May", RGB(230, 50, 50), 20.0); bchart1.Bars.Add(L"June", RGB(50, 230, 50), 40.0); bchart1.Bars.Add(L"July", RGB(50, 50, 230), 80.0); bchart1.MaxY = 100.0; bchart1.Text = L"Monday"; // this->SendMessage(WM_SIZE, 0, MAKELPARAM(width, height)); } void Simple::tabh1_SelectionChanged(Win::Event& e) { const int selectedIndex = tabh1.SelectedIndex; if (selectedIndex == 0) { bchart1.Text = L"Monday"; } else { bchart1.Text = L"Tuesday"; } } void Simple::tabh1_SelectionChanging(Win::Event& e) { } void Simple::Window_Size(Win::Event& e) { const int tabHeight = tabh1.GetMinimumHeight(); tabh1.Move(0, 0, width, tabHeight, true); // const int space = 10; const int barcharHeight = height - tabHeight - space; bchart1.Move(0, tabHeight + space, width, barcharHeight, true); } |