GDI |
| The operating system Microsoft Windows uses the GDI (Graphics Device Interface) to draw everything (or a large part) in the computer screen. Starting in Microsoft Windows XP, GDI+ was introduced to perform drawing in the computer. Both interfaces, GDI and GDI+, can be used to draw in: the screen, a document sent to the printer, or an image file. Microsoft Windows Vista, Windows 7 and Windows 8 are based on Direct2D which is part of DirectX. El sistema operativo Microsoft Windows utiliza la GDI (Graphics Device Interface) para dibujar todo (o gran parte) de lo que aparece en la pantalla. A partir de Microsoft Windows XP se introdujo la librería GDI+ que es una librería de gráficos también usada para dibujar. Ambas interfaces, GDI y GDI+, se pueden usar para dibujar en la pantalla, un documento enviado a la impresora o bien un archivo de imagen. Microsoft Windows Vista, Windows 7 y Windows 8 están basados en Direct2D que es parte de DirectX. |
| Tip |
| The main advantage of using GDI is that it is very fast. The main advantage of GDI+ is that it supports more graphic effects, and it can create image files such as: GIF, JPG, etc., while GDI support only bitmaps BMP. La principal ventaja de la GDI es que es rápida. La principal ventaja de GDI+ es que permite crear más efectos con los gráficos y puede crear archivos de imágenes tales como GIF, JPG, etc., mientras que GDI trabaja solamente con mapas de bits BMP. |
WM_PAINT or Window_Paint |
| Each window (and each control) in a program must draw itself in the screen so that the user can see it. The operating system Microsoft Windows sends a message (WM_PAINT) or a notification Window_Paint when the window (or control) needs to be painted. For instance, a button has a function that paints the button. Thus, every time the button is displayed in the computer screen, Microsoft Windows notifies the button so that the button paints itself. All controls (textbox, list view, etc.) have a painting function that creates a drawing that allows the user to identify the control and its state. Cada ventana (y cada control) en un programa debe dibujarse en la pantalla de tal forma que el usuario lo pueda ver. El sistema operativo Microsoft Windows envía un mensaje (WM_PAINT) o una notificación Window_Paint cuando la ventana (o control) necesita pintarse. Por ejemplo, un botón tiene una función que pinta el botón. Así, cada vez que el botón se muestra en la pantalla de la computadora, Microsoft Windows envía una notificación al botón para que el botón se pinte. Todos los controles (cajas de texto, list views, etc.) tienen una función de pintado que crea un dibujo que permite al usuario identificar el control y su estado. |
| Problem 1 |
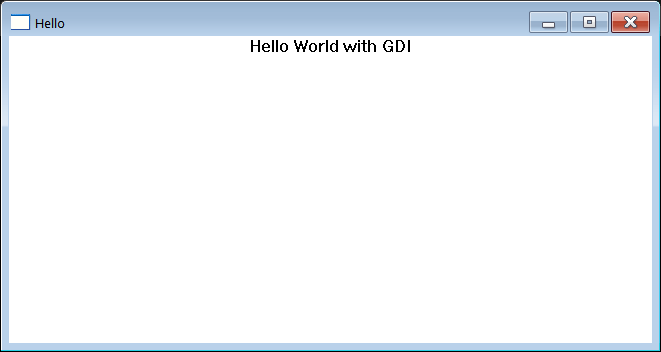
| Create a Window Application called Hello to draw the sentence "Hello World with GDI" in the center of a Window Application using Microsoft GDI. Cree una Window Application (Aplicación de ventana) llamado Hello para dibujar la frase: "Hello World with GDI" en el centro de una aplicación de ventana usando Microsoft GDI. |
| Step A |
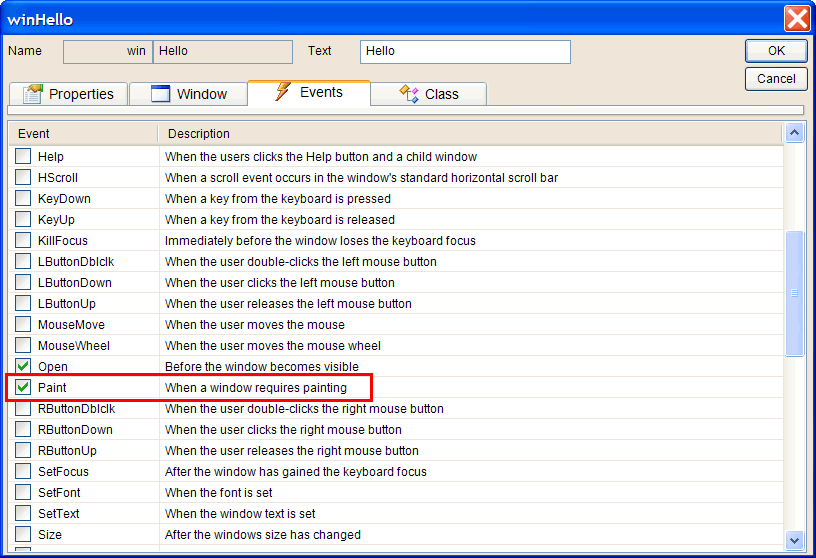
| Open Wintempla a double click anywhere in the window area to open the Properties window. Click on the Events tab and mark the Paint event as shown. Close Wintempla and edit Hello.cpp file as shown. Abra Wintempla y haga doble clic en cualquier lugar del área de la ventana para abrir la ventana de propiedades. Haga clic en la pestaña de Events y marque el evento Paint como se muestra. Cierre Wintempla y edite el archivo Hello.cpp como se muestra. |
| Hello.cpp |
| void Hello::Window_Open(Win::Event& e) { } void Hello::Window_Paint(Win::Event& e) { CG::Gdi gdi(hWnd, true, false); gdi.SetTextAlign(TA_CENTER | TA_TOP); gdi.TextOut(width/2, 0, L"Hello World with GDI"); } |
GDI Object |
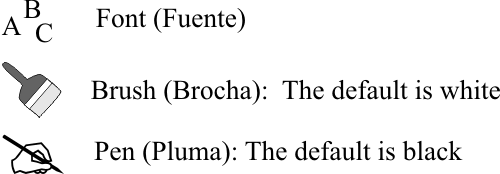
| The three main GDI objects are: pen, brush and font. A pen is used to draw the border of an object. The brush is used to fill the interior of an object. A font is used to draw characters. There is always a pen, a brush and a font ready to draw. Los tres objetos GDI son: pluma, brocha y fuente. Una pluma es usada para dibujar el borde de un objeto. La brocha es usada para llenar el interior de un objeto. Una fuente es usada para dibujar letras. Siempre hay una pluma, una brocha y una fuente lista para dibujar. |
| Tip |
| Wintempla encapsulates GDI in the class Win::Gdi. One of the main advantages of this class is that it allows writing easy to read code because this class handles automatically object destruction and selection. Wintempla encapsula GDI en la clase Win::Gdi. Una de las principales ventajas de esta clase es que permite escribir código fácil de leer ya que está maneja la destrucción y selección de objetos en forma automática. |
DirectX |
| DirectX is a graphics platform that can be accelerated using the hardware of a Graphics Video Card. The main components of DirectX are: DirectWrite, Direct2D and Direct3D. DirectX es una plataforma de gráficos que puede ser acelerada usando el hardware de la Tarjeta de Gráficos. Los componentes principales de DirectX son: DirectWrite, Direct2D y Direct3D. |
DirectWrite |
| DirectX uses DirectWrite to draw text with specific properties such as: font, alignment, size, color, etc. To use DirectWrite you need to include the dwrite.h header file. DirectX usa DirectWrite para dibujar texto con propiedades específicas tales como: fuente, alineación, tamaño, color, etc. Para usar DirectWrite usted necesita incluir el archivo de encabezado dwrite.h. |
Direct2D |
| Direct2D provides high performance and high quality rendering for 2D drawing, bitmaps and text. It is hardware-accelerate and requires the d2d1.h header file and the d2d1_1.h header file. You need also to link with D2d1.lib. Direct2D proporciona dibujo en dos dimensiones de alto desempeño y de alto calidad para figuras geométricas, mapas de bits y texto. Este acelerado por hardware y requiere el archivo de encabezado d2d1.h y el archivo de encabezado d2d1_1.h. Usted necesita también enlazar con D2d1.lib. |
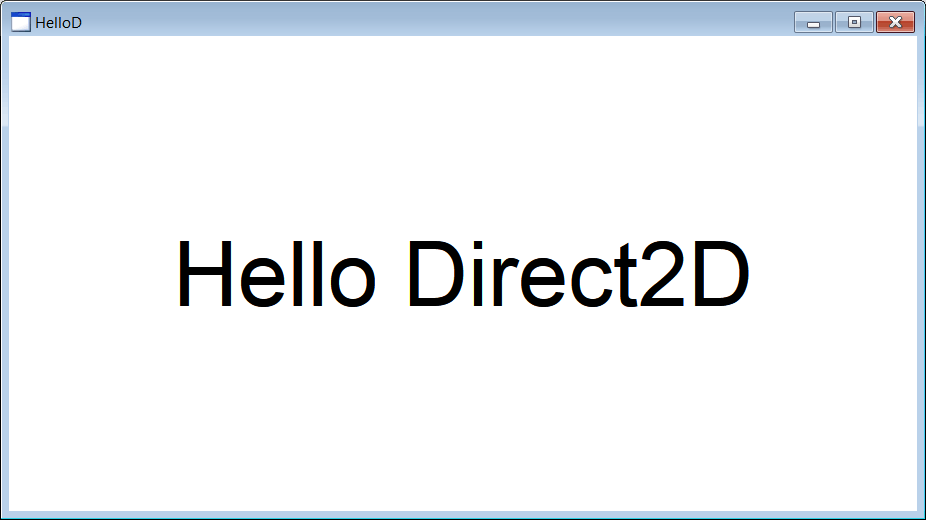
| Problem 2 |
| Create a Window Application called HelloD to draw the sentence "Hello Direct2D" in the center of a Window Application using Microsoft Direct 2D. Cree una Window Application (Aplicación de ventana) llamado HelloD para dibujar la frase: "Hello Direct2D" en el centro de una aplicación de ventana usando Microsoft Direct 2D. |
| HelloD.h |
| #pragma once //______________________________________ HelloD.h #include "Resource.h" class HelloD: public Win::Window { public: HelloD() { } ~HelloD() { } Direct::Graphics graphics; Direct::SolidBrush brushBlack; Direct::TextFormat textFormat; . . . }; |
| HelloD.cpp |
| . . . int APIENTRY wWinMain(HINSTANCE hInstance, HINSTANCE , LPTSTR cmdLine, int cmdShow){ HelloD app; app.CreateMainWindow(L"HelloD", cmdShow, IDI_HelloD, NULL, (HBRUSH)::GetStockObject(NULL_BRUSH), hInstance); return app.MessageLoop(IDC_HelloD); } void HelloD::Window_Open(Win::Event& e) { brushBlack.Create(graphics, 0.0f, 0.0f, 0.0f, 1.0f); // red, green, blue, alpha textFormat.Create(graphics, L"Arial", false, false, 72.0f, L"en-us"); textFormat->SetTextAlignment(DWRITE_TEXT_ALIGNMENT_CENTER); textFormat->SetParagraphAlignment(DWRITE_PARAGRAPH_ALIGNMENT_CENTER); } void HelloD::Window_Paint(Win::Event& e) { if (graphics.BeginDraw(hWnd, width, height, 1.0f, 1.0f, 1.0f, 1.0f) == false) return; // red, green, blue, alpha graphics.SetTransform(D2D1::Matrix3x2F::Identity()); D2D1_SIZE_F size = graphics.GetSize(); D2D1_RECT_F rect = D2D1::RectF(0.0f, 0.0f, size.width, size.height); graphics.DrawTextX(L"Hello Direct2D", textFormat, rect, brushBlack); graphics.EndDraw(true); } |
| Problem 3 |
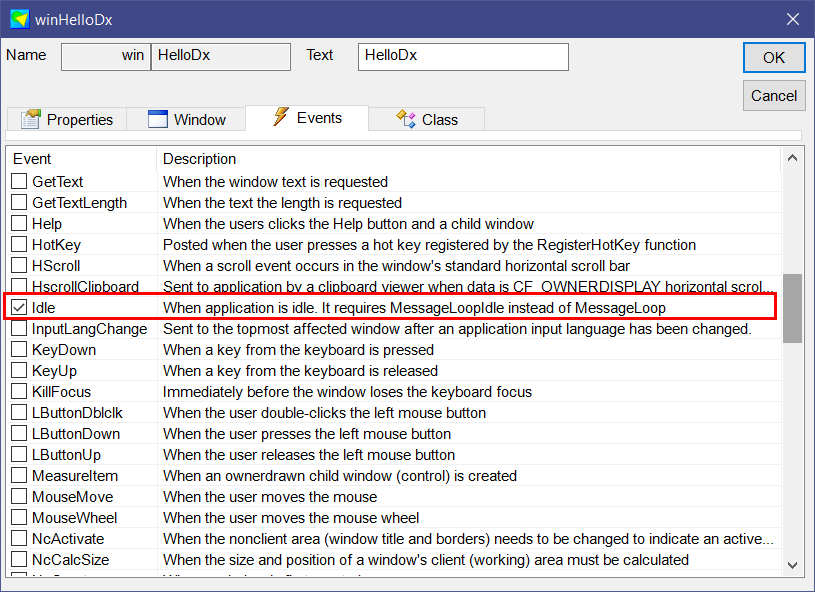
| Create a Wintempla Window Applicaction called HelloDx to display some text using DirectWrite and Direct2D (observe that this is not a DirectX application). After creating the application, open Wintempla and double click anywhere in the editor to set the Idle event as shown. Cree una aplicación de Ventana usando Wintempla llamada HelloDx para desplegar un texto usando DirectWrite y Direct2D (observe que esta no es una aplicación de DirectX). Después de crear el programa, abra Wintempla y haga clic doble en cualquier parte del editor para fijar el evento de Idle como se muestra. |
| Step A |
| Edit the HelloDx.h file and the HelloDx.cpp file as shown. Do not forget to change the Message Loop at the top of the HelloDx.cpp file so that you can use the Window_Idle event. In the same way, you may want to use the NULL_BRUSH instead of the regular window color. Edite el archivo HelloDx.h y el archivo HelloDx.cpp como se muestra. No se olvide de cambiar el Message Loop en la parte de arriba del archivo HelloDx.cpp para poder usar el evento Window_Idle. De la misma forma, usted quisiera usar la NULL_BRUSH en lugar del color regular de la ventana. |
| HelloDx.h |
| #pragma once //______________________________________ HelloDx.h #include "Resource.h" class HelloDx: public Win::Window { public: HelloDx() { } ~HelloDx() { } Sys::Stopwatch sw; Direct::Graphics graphics; Direct::TextFormat textFormat; Direct::SolidBrush brushBlack; float x = 0.0f; float y = 0.0f; void RenderScene(); . . . }; |
| HelloDx.cpp |
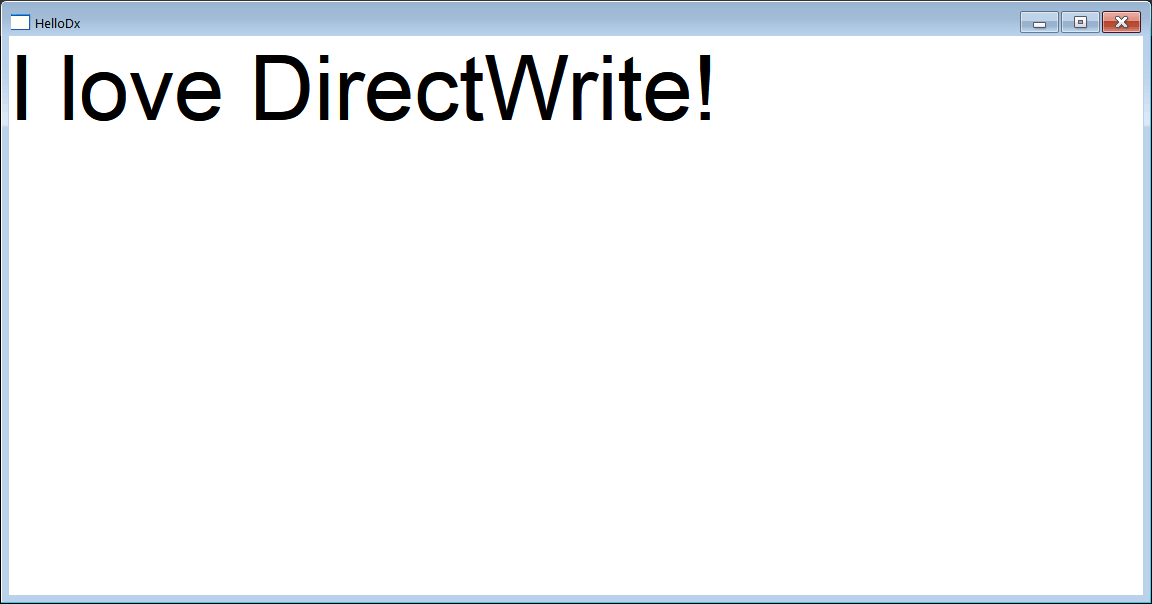
| . . . int APIENTRY wWinMain(HINSTANCE hInstance, HINSTANCE , LPTSTR cmdLine, int cmdShow){ HelloDx app; app.CreateMainWindow(L"HelloDx", cmdShow, IDI_HelloDx, NULL, (HBRUSH)::GetStockObject(NULL_BRUSH), hInstance); return app.MessageLoopIdle(IDC_HelloDx); } void HelloDx::Window_Open(Win::Event& e) { textFormat.Create(graphics, L"Arial", false, false, 72.0f, L"en-us"); textFormat->SetTextAlignment(DWRITE_TEXT_ALIGNMENT_LEADING); textFormat->SetParagraphAlignment(DWRITE_PARAGRAPH_ALIGNMENT_NEAR); brushBlack.Create(graphics, 0.0f, 0.0f, 0.0f, 1.0f); } void HelloDx::RenderScene() { x += (float)(sw.GetSeconds() * 10.0); y += (float)(sw.GetSeconds() * 12.0); sw.Start(); D2D1_RECT_F layoutRect = D2D1::RectF(x, y, (float)width, (float)height); const wchar_t* message = L"I love DirectWrite!"; graphics.DrawTextX(message, textFormat, layoutRect, brushBlack); } void HelloDx::Window_Idle(Win::Event& e) { if (graphics.BeginDraw(hWnd, width, height, 1.0f, 1.0f, 1.0f, 1.0f) == false) return; RenderScene(); graphics.EndDraw(false); } |
Pixel |
| A pixel is the smallest unit that can be drawn. Each computer screen has a specific pixel resolution, however, the left top corner of each window has the coordinates x = 0, y = 0. As GDI coordinates points are specified as integer values, any computation using double values must be converted to int. In these cases, it is always a good idea to add 0.5 to round the conversion to the nearest integer value. For instance, 0.6 will be converted to 1, however, 0.4 will be converted to zero as shown in the code below. Un pixel es la unidad más pequeña que puede ser dibujada. Cada monitor de computadora tiene una resolución específica en pixeles, sin embargo, la esquina superior izquierda de cada ventana tiene las coordenadas x = 0, y = 0. Como los puntos de coordenadas en las GDI se especifican en valores enteros, cualquier cálculo que involucre valores de punto flotante debe ser convertido a entero. En estos casos, es buena idea sumar 0.5 para redondear la conversión al valor entero más cercano. Por ejemplo, 0.6 será convertido a 1, sin embargo, 0.4 será convertido a cero como se muestra en el código de abajo. |
| Program.cpp |
| void Program::Window_Open(Win::Event& e) { double y = 0.6; int iy = (int)(y+0.5); // double z = 0.4; int iz = (int)(z+0.5); } |
| Problem 4 |
| Create a program called PixelSin to draw a sine wave using green pixels as shown. You can use the pre-defined variables: width and height to know the width and height of the window. Cree un programa llamada PixelSin para dibujar una onda senoidal usando pixeles verdes como se muestra. Usted puede usar las variables pre-definidas: width y height para conocer el ancho y el alto de la ventana. |
| PixelSin.cpp |
| . . . void PixelSin::Window_Open(Win::Event& e) { } void PixelSin::Window_Paint(Win::Event& e) { CG::Gdi gdi(hWnd, true, false); int x, y; //________________________________________________ 1. Horizontal line for (x = 0; x < width; x++) { gdi.SetPixel(x, height/2, RGB(200, 200, 200)); } //________________________________________________ 2. Vertical line for (y = 0; y < height; y++) { gdi.SetPixel(width/2, y, RGB(200, 200, 200)); } //________________________________________________ 3. Sine const double deltaX = 2.0*M_PI/width; const int deltaY = -height/2; for (x = 0; x < width; x++) { y = (int)(deltaY*sin(x*deltaX) + 0.5); y += height/2; gdi.SetPixel(x, y, RGB(255, 0, 0)); } } |
| Tip |
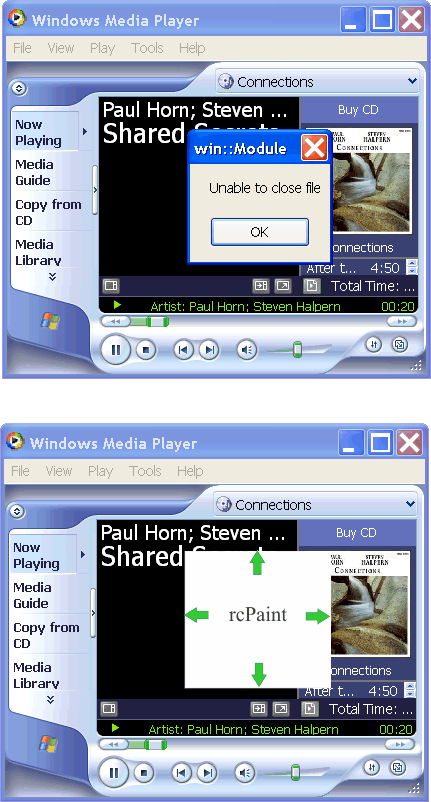
| When Microsoft Windows sends the message WM_PAINT or call the function Window_Paint requesting painting the window, it is possible to find the exact area to paint using the variable ps.rcPaint or gdi.GetRcPaint(). When creating programs that draw in a window, always consider painting only the area specified instead of painting the whole window. For instance, in the example below, when the user diminishes the Message Box, the window underneath will receive a WM_PAINT messages specifying in the variable rcPaint indicating the area that was covered with the Message Box. The program can use this information to only paint this area instead of painting the whole window. Cuando Microsoft Windows envía el mensaje WM_PAINT o llama la función Window_Paint solicitando el pintando de la ventana es posible encontrar la específica área que se requiere pintar dentro de la ventana por medio del elemento ps.rcPaint o gdi.GetRcPaint(). Cuando realice programas que pinten la ventana, siempre considere pintar solamente el área indicada en este rectángulo en lugar de toda la ventana. Por ejemplo, en el caso de abajo, cuando el usuario cierra la caja de mensaje, la ventaja de abajo recibirá un mensaje WM_PAINT especificando en la variable rcPaint el área que estaba cubierta con la caja de mensaje. El programa puede usar esta información para repintar solamente esta área de la ventana en lugar de volver a pintar toda la ventana. |