An icon


Icon

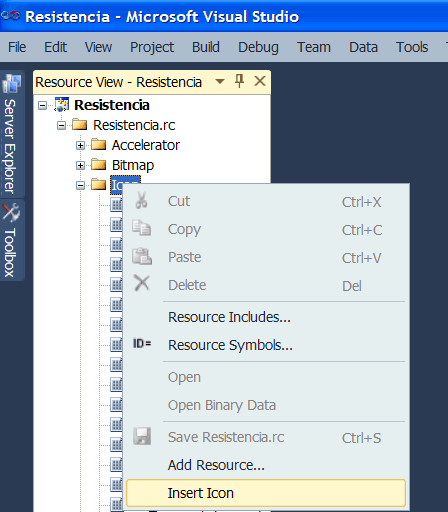
An icon is a collection of images. Most programs in Microsoft Windows use icons to display images. Usually, inside an icon file (*.ico) there are several imágenes of different sizes and color resolutions. You can add an icon to most Microsoft Visual Studio projects (as shown in the figure below):
  1. Open the resource view
  2. Expand the tree in resource view using the mouse
  3. Select the Icon folder and right click with the mouse to open the context menu
  4. Select the Insert Icon option

Un icono es una colección de imágenes. La mayoría de los programas en Microsoft Windows usan iconos para mostrar imágenes. Usualmente, dentro de un archivo de icono (*.ico) hay varias imágenes de distintos tamaños y resoluciones. Usted puede agregar un icono a la mayoría de los proyectos de Microsoft Visual Studio (como se muestra en la figura de abajo):
  1. Abra la vista de recursos
  2. Expanda el árbol en la vista de recursos usando el ratón
  3. Seleccione el folder de los iconos y con el botón derecho del ratón abra el menú de contexto
  4. Seleccione la opción Insert Icon

Add

Image List

An image list is a collection of icons. Image list are very important because many GUI elements (GUI controls) operate with them. Toolbars, list views, drop down boxes with images among others use image lists.
Una lista de imágenes es una colección de iconos. Las listas de imágenes son muy importantes porque varios elementos GUI (controles GUI) operan con ellas. Las barras de herramientas, las listas de datos, las cajas desplegables con imágenes entre otros usan las listas de imágenes.

Tip
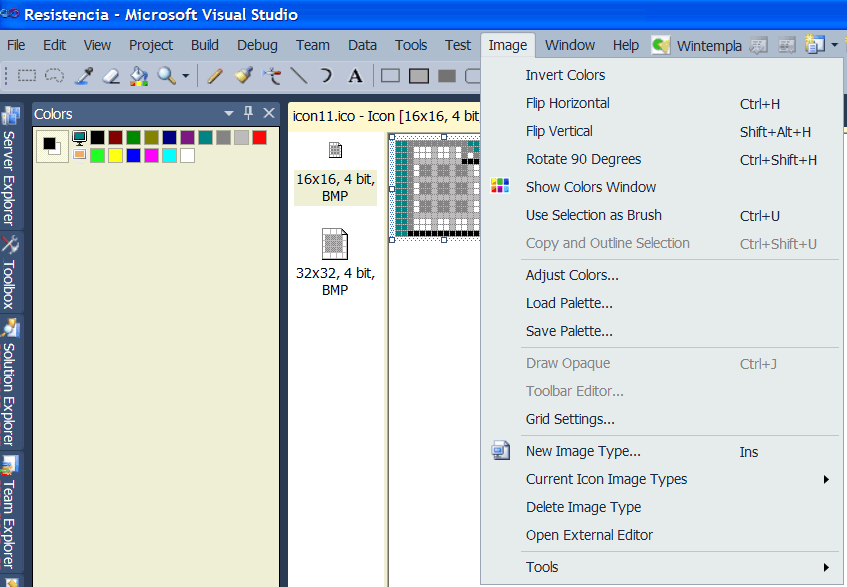
Use the Image menu to manipulate the icon. You may add or delete images in the same icon file. The file must have at least one image inside it. You may add as many images as you wish inside the file, but you must edit all of them. As the images of an icon are small, the programmer must have some color and drawing expertise so that the images look good at very low resolutions. The most critical part of an image is the border as the image must look good with any background.
Use el menú de Imagen para manipular el icono. Usted puede agregar o borrar imágenes en el mismo archivo de icono. El archivo debe tener al menos una imagen dentro de él. Usted puede agregar todas las imágenes que quiera al archivo, pero usted debe editar todas ellas. Como las imágenes de un icono son pequeñas, el programador debe tener experiencia sobre cómo usar colores y sobre cómo dibujar para que las imágenes se vean bien a una resolución muy baja. La parte más crítica de una imagen es el borde ya que la imagen debe verse bien en cualquier fondo.

ImageMenu

Problem 1
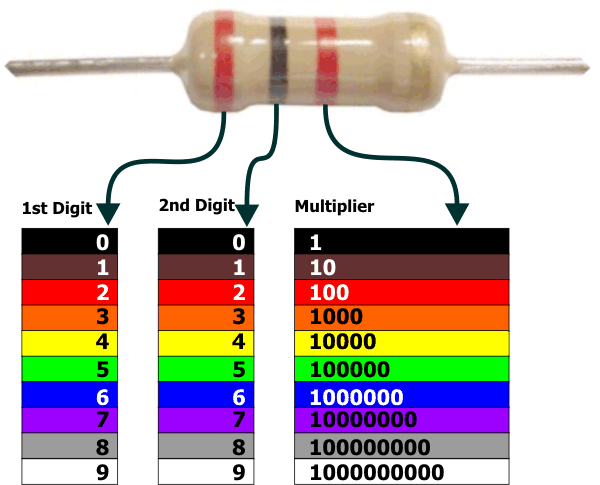
Create a project called Resistencia to read the value of a resistor using the first three bands. A resistor is a device used in electronics; it has four color bands. The color of the first band indicates the first digit of the value of the resistor. The color of the second band indicates the second digit of the value of the resistor. The color of the third band indicates the number of zeros that should be appended to the first two digits. To display the omega symbol, change the font family of the label to Symbol and use a W.
Cree un proyecto llamado Resistencia para leer el valor de una resistencia usando sus tres primeras bandas. Una resistencia es un dispositivo usado en electrónica; este tiene cuatro bandas de colores. El color de la primera banda indica el valor del primer digito del valor de la resistencia. El color de la segunda banda indica el segundo digito del valor de la resistencia. El color de la tercera banda indica el número de ceros que deben agregárseles a los dos primeros dígitos. Para mostrar el símbolo de omega, cambie la fuente de la etiqueta a Symbol y use una W.

Resistor

Step A
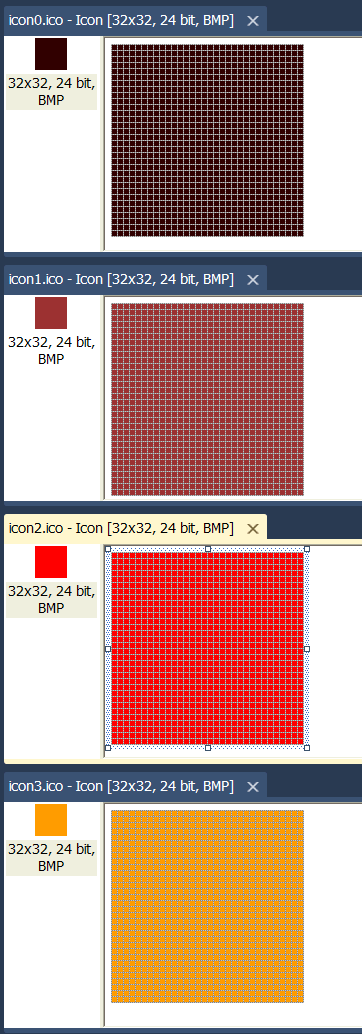
Open resource view and insert 10 icons. Open the first icon and use the Image menu to add an image: 32x32 24 bits. On the menu: Image > Image Type . Delete the remaining images that are included in the first icon (from the Image menu, click on Delete Image Type. Perform the same procedure with the 9 remaining icons. At the end, you should have 10 icons, each with a single 32x32 image.
Abra la vista de recursos e inserte 10 iconos. Abra el primer icono y use el menú de Imagen para agregar una imagen de 32x32 24 bits. En el menú: Image > Image Type . Borre todas las imágenes restantes que hay en el primer icono (En el menú de imagen, haga clic en Delete Image Type). Realice el mismo procedimiento con los 9 iconos restantes. Al final, usted debe tener 10 iconos, cada uno con una única imagen de 32x32.

ResistenciaIcons

Step B
Open the first icon (IDI_ICON0) and fill the image with a black color. Fill IDI_ICON1 with brown. Fill IDI_ICON2 with red. Fill IDI_ICON3 with orange. Fill IDI_ICON4 with yellow. Fill IDI_ICON5 with green. Fill IDI_ICON6 with blue. Fill IDI_ICON7 with purple. Fill IDI_ICON8 with gray. Fill IDI_ICON9 with white.
Abra el primer icono (IDI_ICON0) y llene la imagen con un color negro. Llene IDI_ICON1 con color café. Llene IDI_ICON2 con color rojo. Llene IDI_ICON3 con naranja. Llene IDI_ICON4 con amarillo. Llene IDI_ICON5 con verde. Llene IDI_ICON6 con azul. Llene IDI_ICON7 con morado. Llene IDI_ICON8 con gris. Llene IDI_ICON9 con blanco.

ResistenciaFilling

Step C
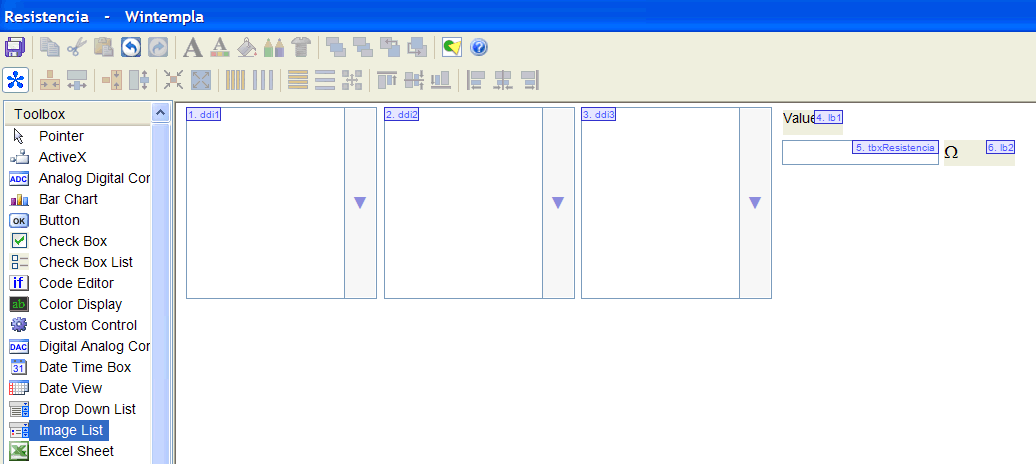
Open the file Resistencia.cpp and use Wintempla to insert three Drop Down Image Lists. Insert also two labels and one textbox as shown. Be sure to press Show All Controls in ToolboxShow All Controls in Toolbox in the toolbar to see all controls.
Abra el archivo Resistencia.cpp y use Wintempla para insertar tres Drop Down Image Lists. Inserte tambien dos etiquetas y una caja de texto como se muestra. Asegúrese de presionar Show All Controls in ToolboxShow All Controls in Toolbox en la barra de herramientas para ver todos los controles.
ResistenciaGUI

Step D
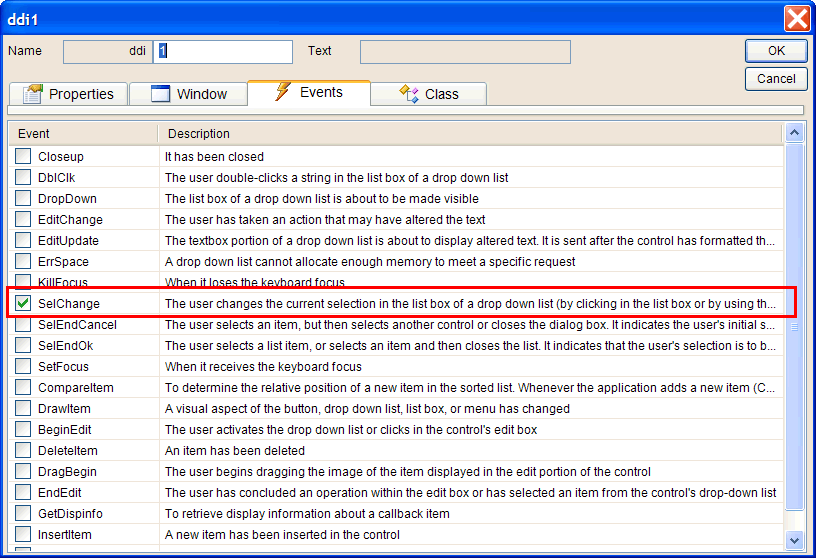
Inside Wintempla while editing the GUI, double click the first drop down image lists, a dialog with several tabs will appear. Open the Events tabs and check the event selection changed. Repeat the same procedure for the other two drop down image lists.
Dentro de Wintempla mientras se está editando la GUI, hacer doble clic en la primera lista de imágenes desplegable, un dialogo con varias pestañas aparecerá. Abra la pestaña de Eventos y marque el evento de cambio de selección. Repita el mismo procedimiento para las otras dos listas de imágenes desplegables.

ddi1Events

Step E
Edit the files: Resistencia.h and Resistencia.cpp as shown below.
Edite los archivos: Resistencia.h y Resistencia.cpp como se muestra abajo.

Resistencia.h
#pragma once //______________________________________ Resistencia.h
#include "resource.h"

class Resistencia: public Win::Dialog
{
public:
     Resistencia()
     {
     }
     ~Resistencia()
     {
     }
     Win::ImageList imgList1;
     Win::ImageList imgList2;
     Win::ImageList imgList3;
     void FillList(Win::ImageList& imgList, Win::DropDownImageList& ddlist);
     void UpdateValue();
protected:
     //______ Wintempla GUI manager section begin: DO NOT EDIT AFTER THIS LINE
     ...
};

Resistencia.cpp
void Resistencia::Window_Open(Win::Event& e)
{
     FillList(imgList1, ddi1);
     FillList(imgList2, ddi2);
     FillList(imgList3, ddi3);
}

void Resistencia::ddi1_SelChange(Win::Event& e)
{
     UpdateValue();
}

void Resistencia::ddi2_SelChange(Win::Event& e)
{
     UpdateValue();
}

void Resistencia::ddi3_SelChange(Win::Event& e)
{
     UpdateValue();
}

void Resistencia::FillList(Win::ImageList& imgList, Win::DropDownImageList& ddlist)
{
     //_____________________________ Fill the image list with the icons
     imgList.Create(32, 32, 10);
     imgList.AddIcon(this->hInstance, IDI_ICON0);
     imgList.AddIcon(this->hInstance, IDI_ICON1);
     imgList.AddIcon(this->hInstance, IDI_ICON2);
     imgList.AddIcon(this->hInstance, IDI_ICON3);
     imgList.AddIcon(this->hInstance, IDI_ICON4);
     imgList.AddIcon(this->hInstance, IDI_ICON5);
     imgList.AddIcon(this->hInstance, IDI_ICON6);
     imgList.AddIcon(this->hInstance, IDI_ICON7);
     imgList.AddIcon(this->hInstance, IDI_ICON8);
     imgList.AddIcon(this->hInstance, IDI_ICON9);
     ddlist.SetImageList(imgList, hWnd);
     //____________________________ Insert the items in the drop down list
     ddlist.Items.Add(0, 0, 0, 0, L"Black", 0);//Index, Spacing, Image, Selected Image, Data
     ddlist.Items.Add(1, 0, 1, 1, L"Brown", 1);
     ddlist.Items.Add(2, 0, 2, 2, L"Red", 2);
     ddlist.Items.Add(3, 0, 3, 3, L"Orange", 3);
     ddlist.Items.Add(4, 0, 4, 4, L"Yellow", 4);
     ddlist.Items.Add(5, 0, 5, 5, L"Green", 5);
     ddlist.Items.Add(6, 0, 6, 6, L"Blue", 6);
     ddlist.Items.Add(7, 0, 7, 7, L"Purple", 7);
     ddlist.Items.Add(8, 0, 8, 8, L"Gray", 8);
     ddlist.Items.Add(9, 0, 9, 9, L"White", 9);
     ddlist.SelectedIndex = 1;
}

void Resistencia::UpdateValue()
{
     const int digit1 = ddi1.SelectedIndex;
     const int digit2 = ddi2.SelectedIndex;
     const int digit3 = ddi3.SelectedIndex;
     this->tbxResistencia.Text = Sys::Convert::ToString(digit1);
     this->tbxResistencia.Text += Sys::Convert::ToString(digit2);
     for(int i = 0; i < digit3; i++)
     {
          this->tbxResistencia.Text += L"0";
     }
}


Resistencia220000

Resistencia5600

Problem 2
Create a Window application called MyIcon using Wintempla to draw an icon using GDI.
Creee una aplicación de Ventana llamada MyIcon usando Wintempla para digujar un icono usando GDI.

Step A
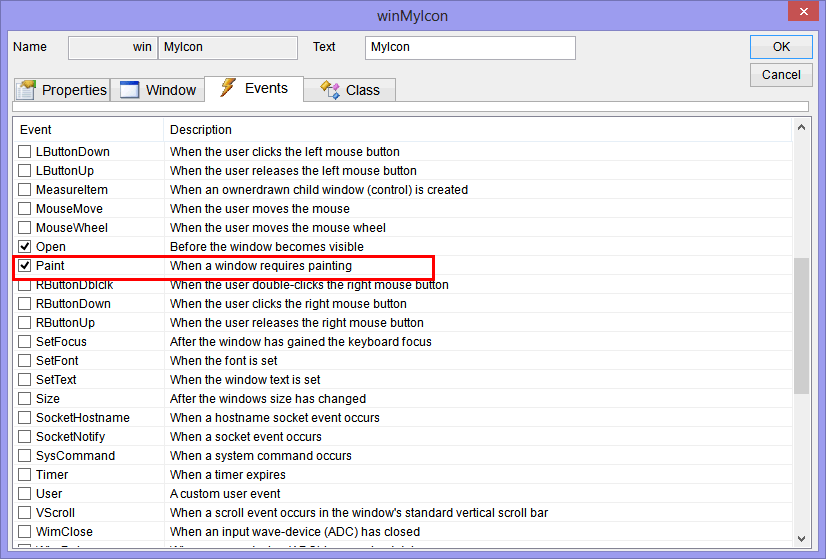
Add to your program the Paint event by opening Wintempla and making double click in the window.Agregue a su proyecto el evento Paint abriendo Wintempla y haciendo doble clic en la ventana.

PaintEvent

Step B
In the resource vieww add an icon.
En la vista de recursos agregue un icono.

AddIcon

Step C
Edit the MyIcon.h and MyIcon.cpp files.
Edite los archivos MyIcon.h y MyIcon.cpp.

MyIcon.h
#pragma once //______________________________________ MyIcon.h
#include "Resource.h"
class MyIcon: public Win::Window
{
public:
     MyIcon()
     {
     }
     ~MyIcon()
     {
     }
     //HICON icon;
     Sys::Icon icon;
     ...
}:

MyIcon.cpp
...

void MyIcon::Window_Open(Win::Event& e)
{
     //icon = ::LoadIcon(hInstance, MAKEINTRESOURCE(IDI_ICON1));
     icon.Load(hInstance, IDI_ICON1);
}

void MyIcon::Window_Paint(Win::Event& e)
{
     CG::Gdi gdi(hWnd, true, false);
     int x = 10;
     int y = 20;
     //::DrawIconEx(gdi.GetHDC(), x, y, icon, 0, 0, 0, NULL, DI_NORMAL);
     gdi.DrawIcon(x, y, icon);
}

MyIconRun

© Copyright 2000-2021 Wintempla selo. All Rights Reserved. Jul 22 2021. Home