Java |
| Java is programming language every similar to the C++ language. A program written in C++ is directly executed by the computer, making the program dependent on the operating system of the computer and/or the hardware. In contrast, a program written in Java is executed by the Java Virtual Machine (JVM), and is generally slower than a program written in C++. Because the JVM runs in several operating systems, a program written in Java can run on several operating systems. One of the main advantages of Java is that the program may run in several OS and hardware without re-compiling. Java es un lenguaje de programación muy similar al lenguaje C++. Un programa en C++ es ejecutado directamente por la computadora, lo cual lo hace dependiente del sistema operativo de la computadora y/o en el hardware. En cambio, un programa en Java es ejecutado por la máquina virtual de Java (JVM), y es generalmente más lento que un programa escrito en C++. Debido a que la máquina de Java corre en varios sistemas operativos, un programa escrito en Java puede correr en varios sistemas operativos. Una de las principales ventajas de Java es que el programa puede correr en varios sistemas operativos y hardware sin re-compilarse. |
| Tip |
| When a program is required to run in Microsoft Windows, Apple and in Linux, it is recommended to use the Java language. Some portable devices, such as cell phones can also execute some programs written in Java. Cuando se desea crear un programa que corra en Microsoft Windows, Apple y en Linux se recomienda usar el lenguaje de Java. Algunos dispositivos portátiles, tales como celulares también pueden ejecutar algunos programas hechos en Java. |
Java IDE |
| There are three popular products to create Java programs: Netbeans, Eclipse and IntelliJ (SE). These products are free; you may download any of them from the Internet. You need also to download and install de Java Development Kit (JDK) to create programs in Java which is also free. Problem 1 assumes you have installed Netbeans and the JDK. Problem 2 assumes you have installed IntelliJ(SE) and the JDK. Hay tres productos populares para crear programas en Java: Netbeans, Eclipse y IntelliJ (SE). Estos productos son gratis; usted puede descargar cualquiera de ellos de la Internet. Usted también necesita descargar e instalar el Kit de Desarrollo de Java (JDK) para crear programas en Java el cual es también gratis. El problema 1 asume que usted ha instalado Netbeans y el JDK. El problema 2 asume que usted ha instalado IntelliJ (SE) y el JDK. |
Java Runtime Environment (JRE) |
| The JDK is necessary to create and compile Java programs. The JRE is necessary to run a program written in Java. El JDK es necesario para crear y compilar programas en Java. El JRE es necesario para ejecutar programas escritos en Java. |
| Tip |
| The following example shows how to print from a console java application. El ejemplo siguiente muestra como imprimir desde un programa de consola en Java. |
| Welcome.java |
| public class Welcome { public static void main(String[] args) { System.out.println("Hello World!"); } } |
| Problem 1 |
| Design a calculator to add to numbers using Java in Netbeans. Diseñe una calculadora para sumar dos números usando Java en Netbeans. |
| Step 1. Create the proyect. |
|
| Step 2. Edit the Graphic User Interface (GUI). |
|
| Step 3. Write the code. |
| Edit the source file by adding the code inside the function: buttonCalculate_Click(java.awt.event.MouseEvent evt) |
| JCalc.java |
| . . . private void buttonCalculate_Click(java.awt.event.MouseEvent evt) { double x = Double.parseDouble(this.jTextFieldX.getText()); double y = Double.parseDouble(this.jTextFieldY.getText()); double result = x + y; this.jTextFieldResult.setText(Double.toString(result)); } |
| Tip |
| Observe that Java does not support the arrow operator (->); instead of pointers Java works with references. Thus, you will use this. instead of this-> Observe Java no soporta el operador de flecha (->); en lugar de los punteros Java trabaja con referencias. Así, usted usará this. en lugar de this-> |
| Step 4. Run the program. |
| On the menu: Debug > Start Debugging En el menu: Debug > Start Debugging |
| Problem 2 |
| Design a calculator to add to numbers using Java in IntelliJ. Diseñe una calculadora para sumar dos números usando Java en IntelliJ. |
| Step 1. Open IntelliJ (Ejecute IntelliJ) |
|
| Step 2. Create a new Project (Crear un nuevo projecto) |
From the New Project Window set:
Desde la ventana de proyecto nuevo:
|
| Tip |
| In case you forget to setup the JDK path properly, you may change later using: File > Project Structure En caso de que usted olvide configurar la ruta del JDK apropiadamente, usted puede cambiarlo más tarde usando: File > Project Structure |
| Step 3. Add a Class to the project (Agregue una clase al proyecto) |
|
main function |
| Each program must have a main function. This function is where the program begins. This function is static member of a class(thus, it is not necessary to have an object of the class to call the function). From IntelliJ you must select the class that has the main function. Cada programa debe tener una función principal. Esta función es dónde el programa comienza. Esta función es un miembro público y estático de una clase (así, no es necesario tener un objeto de la clase para llamar la función. Desde IntelliJ usted debe seleccionar la clase que tiene la función principal. |
| Step 4. Edit the CalJava.java file as shown below. |
| This file shows a basic structure for a Java program. There is main function inside the class. There are three text boxes and one button. In Java, the text boxes are called JTextField, while the buttons are called JButton. Este archivo muestra una estructura básica para un programa en Java. Hay una función principal dentro de la clase. Hay tres cajas de texto y un botón. En Java las cajas de texto se llaman JTextField, mientras que los botones se llaman JButton. |
| CalJava.java |
| import java.awt.*; import java.awt.event.*; import javax.swing.*; public class CalJava extends JFrame implements ActionListener { private JTextField tbxX; private JTextField tbxY; private JTextField tbxResult; private JButton btCalculate; public CalJava() { this.setTitle("Calculator"); this.setSize(400, 400); this.addWindowListener(new ExitListener()); // Container pane = this.getContentPane(); pane.setLayout(new FlowLayout()); //______________________________________________ tbxX tbxX = new JTextField(10); pane.add(tbxX); //______________________________________________ + pane.add(new JLabel("+")); //______________________________________________ tbxY tbxY = new JTextField(10); pane.add(tbxY); //______________________________________________ = pane.add(new JLabel("=")); //______________________________________________ tbxResult tbxResult = new JTextField(10); pane.add(tbxResult); // btCalculate = new JButton("Calculate"); pane.add(btCalculate); btCalculate.addActionListener(this); } public void actionPerformed(ActionEvent e) { if (e.getSource() == btCalculate) { final double x = Double.parseDouble(this.tbxX.getText()); final double y = Double.parseDouble(this.tbxY.getText()); final double result = x + y; this.tbxResult.setText(Double.toString(result)); } } public static void main(String[] args) { CalJava frame = new CalJava(); frame.pack(); frame.setVisible(true); } public static class ExitListener extends WindowAdapter { @Override public void windowClosing(WindowEvent e) { System.exit(0); } } } |
Comments about the code |
|
| Tip |
| Observe that in order to create a JTextField an integer value is necessary to indicate the width of the control in characters. Observe que para crear un JTextField se proporciona un entero que indica el ancho del control en caracteres. |
| Step 5. Run the Program |
| From the menu select Run > Run.... Select the CalJava class. The program window will open at the left top corner of the screen. Desde el menú seleccione Run > Run.... Seleccione la clase CalJava. La ventana del programa se abrirá en la esquina superior izquierda de la pantalla. |

| Tip |
| If you program does not compile, be sure that the JDK is appropriately selected: File > Project Structure... > Platform Settings > SDK > JDK Home path. En caso de que el programa no pueda compilarse, asegúrese de que el JDK se encuentre propiamente seleccionado: File > Project Structure... > Platform Settings > SDK > JDK Home path. |
static member function of a class |
| It is a member function that can be called without creating an object of a class. Java requires the main function to be static because Java does not allow global functions as C++ does. Es un función miembro que puede ser llamada sin crear un objeto de la clase. Java requiere que la función principal sea estática porque Java no permite funciones globales como lo hace C++. |
| Problem 3 |
| Design a calculator called IdeaCalc to add to numbers using Java and the IntelliJ GUI editor. Diseñe una calculadora llamada IdeaCalc para sumar dos números usando Java y el editor de GUI de IntelliJ. |
| Step 1. Create a new project (Cree un Nuevo proyecto) |
| Create the new Java Project or Java Module Cree un nuevo proyecto de Java o módulo de Java |
| Step 2. Add a new GUI (Agregue una GUI) |
|

| Step 3. Edit the GUI as shown below. |
| You may drag the controls from the toolbox and drop them over the GUI. Be sure to drop them at right border of the previous control. After placing the controls you may edit each control to have the following names: tbxX, tbxY, tbxResult, btCalculate. Remember that in Java a textbox is called JTextField, and a label is called JLabel. Usted puede arrastrar los controles desde la caja de herramientas y soltarlos sobre la GUI. Asegúrese de soltarlos sobre el borde de la derecha del control previo. Después de colocar los controles usted puede editar cada control para que tengan los siguientes nombres: tbxX, tbxY, tbxResult, btCalculate. Recuerde que en Java una caja de texto se llama JTextField, y una etiqueta se llama JLabel. |
| Step 4. Add the listener to the button. |
| Use the right button of the mouse as shown to open the context menu, and add a listener to the Calculate button. Select: Action Listener. Use el botón derecho del ratón como se muestra para abrir el menú de contexto, y agregar el listener al botón de Calculate. Seleccione: Action Listener. |
| Step 5. Edit the Java files |
| Edit the Calculator.java file as shown. Edite el archivo Calculator.java como se muestra. |
| Calculator.java |
| import java.awt.event.ActionEvent; import java.awt.event.ActionListener; import javax.swing.*; public class Calculator extends JFrame { private JPanel panel1; private JTextField tbxX; private JTextField tbxY; private JTextField tbxResult; private JButton btCalculate; public Calculator() { this.setContentPane(panel1); btCalculate.addActionListener(new ActionListener() { public void actionPerformed(ActionEvent e) { if (e.getSource() == btCalculate) { final double x = Double.parseDouble(tbxX.getText()); final double y = Double.parseDouble(tbxY.getText()); final double result = x + y; tbxResult.setText(Double.toString(result)); } } }); } public static void main(String[] args) { Calculator frame = new Calculator(); frame.pack(); frame.setVisible(true); } } |
| Step 6. Run the Program |
| Add a configuration and select Application. In the configuration dialog, select the "main" function of the "Calculator" class. When done, from the menu select Run > Run.... Select the Calculator class. The program window will open at the left top corner of the screen. Agregue una configuración y seleccione Application. En el diálogo de configuración, seleccione la función "main" de la clase "Calculator". Cuando termine, desde el menú seleccione Run > Run.... Seleccione la clase Calculator. La ventana del programa se abrirá en la esquina superior izquierda de la pantalla. |
| Tip |
| A file with the extension *.java is compiled to produce a file the extension *.class or *.jar. A *.jar file has one or more *.class files. To compile you can use javac.exe, to execute a program you can use java.exe. The file javac.exe is distributed with the JDK, while java.exe is distributed with the JRE. It is possible to execute any Java program with the extensions *.class or *.jar from the command line using java.exe as long as the environment variable "path" includes the JRE folder (where java.exe is locate). Un archivo con extensión *.java se compila a un archivo con extensión *.class o con *.jar. Un archivo *.jar contiene uno o varios archivos con extensión *.class. Para compilar se usa javac.exe y para ejecutar se usa java.exe. El archivo javac.exe solamente se distribuye en el JDK, mientras que el java.exe se distribuye en el JRE. Es posible ejecutar cualquier programa de Java con extensión *.class o *.jar desde el comando de línea usando java.exe, siempre y cuando en la variable de ambiente "path" se incluya el del JRE (donde está java.exe). |
JPanel |
| In Java, a JPanel is a rectangular area where you can place several GUI elements, such as: buttons, textboxes, etc. JPanels are use to organized GUI elements. They are convenient when the main window changes of size, because each panel has its own rules to resize the elements inside it. En Java, un JPanel es una área rectangular donde se pueden colocar varios elementos GUI, tales como botones, cajas de texto, etc. Los JPanels son usados para organizar los elementos GUI. Estos son convenientes cuando la ventana principal cambia de tamaño, porque cada panel tiene sus propias reglas para cambiar el tamaño de los elementos de adentro. |
Layout Manager |
| A layout manager is a class in Java to organize GUI elements; the manager is responsible of resizing and moving the components when the main window changes of size. Un administrador de ubicación es una clase en Java para organizar los elementos GUI; el administrador es de responsable de cambiar de tamaño y posición los componentes cuando la ventana principal cambia de tamaño. |
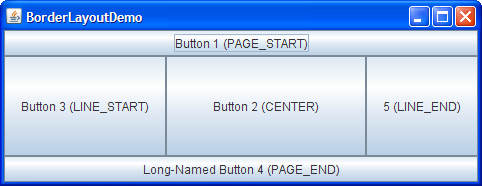
BorderLayout |
| It places components in up to five areas: top, bottom, left, right, and center. All extra space is placed in the center area. This manager is used when the GUI element in the center benefits from the area, for instance a graph or a text area to input a lot of text. Este coloca los componentes en hasta cinco áreas: arriba, abajo, izquierda, derecha y al centro. Todo el espacio extra se asigna a la área del centro. Este administrador se utiliza cuando el elemento GUI central se beneficia del área, por ejemplo una gráfica o una área para introducir mucho texto. |
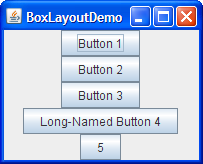
BoxLayout |
| It puts components in a single row or column. It respects the elements' requested maximum sizes, and the programmer can align each components. Este coloca los componentes en un solo renglón o columna. Este toma en cuenta el máximo tamaño de los componentes, y el programador pueda alinear cada componente. |
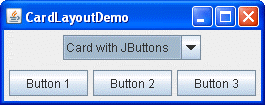
CardLayout |
| It lets implement an area that contains different components at different times. A CardLayout is often controlled by a combo box, each time the selection of a combo box changes a different panel is shown. Este permite implementa una área que contiene componentes en tiempos diferentes. Un CardLayout se controla típicamente con una lista desplegable, cada vez que se cambia la selección de la lista desplegable un panel diferente se muestra. |
FlowLayout |
| It is the default layout manager for every JPanel. It simply lays out components in a single row, starting a new row if its container is not sufficiently wide. Este es el administrador de defecto para cada JPanel. Este simplemente acomoda los componentes en un solo renglón, se crea un renglón adicional si el contenedor no es lo suficientemente ancho. |

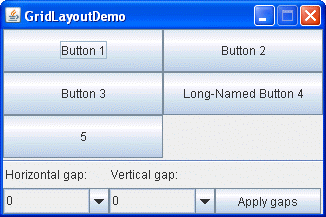
GridLayout |
| It simply makes a bunch of components equal in size and displays them in the requested number of rows and columns. Este simplemente hace un grupo de componentes del mismo tamaño y los acomoda en un número dado de renglones y columnas. |
GridBagLayout |
| It is a sophisticated, flexible layout manager. It aligns components by placing them within a grid of cells, allowing components to span more than one cell. The rows in the grid can have different heights, and grid columns can have different widths. Este es un administrador sofisticado y flexible. Este alinea los componentes colocándolos en una rejilla con celdas, permitiendo que los componentes se expandan a más de una celda. Los renglones de la rejilla pueden ser de altura diferente, y el ancho de las columnas puede ser diferente. |

GroupLayout |
| It is a layout manager that was developed for use by GUI builder tools (IDE: Netbeans, Eclipse, IntelliJ,...) but it can also be used manually. GroupLayout works with the horizontal and vertical layouts separately. The layout is defined for each dimension independently. Consequently, however, each component needs to be defined twice in the layout. Este administrador fue desarrollado para las herramientas de diseño de GUI (IDE: Netbeans, Eclipse, IntelliJ,...), pero también puede ser usado manualmente. GroupLayout opera en separando la organización de la ubicación en horizontal y vertical. La ubicación en cada dimensión se define en forma independiente. Consecuentemente, sin embargo, cada componente necesita ser definido dos veces. |
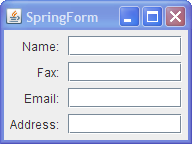
SpringLayout |
| It is a flexible layout manager designed for use by GUI builders. It lets you specify precise relationships between the edges of components under its control. For example, you might define that the left edge of one component is a certain distance (which can be dynamically calculated) from the right edge of another component. SpringLayout lays out the elements according to a set of constraints. Este es un administrador flexible diseñado para las herramientas para construir GUIs. Esta deja especificar en forma precisa las relaciones entre los bordes de los componentes bajo su control. Por ejemplo, usted puede decir que el borde izquierdo de un componente se encuentra a cierta distancia del borde la derecha de otro componente. SpringLayout acomoda los elementos de acuerdo a un conjunto de restricciones. |
CPU-Intensive Application |
It is a program that requires a high number of CPU operations to complete in an acceptable amount of time. These types of applications include:
Es un programa que requiere un alto número de operaciones de CPU completadas en un tiempo aceptable de tiempo. Este tipo de aplicaciones incluyen:
|
Choosing a Programming Language |
| It is common to think that a programmer should focus in learning the best programming language. As programming languages are designed for different purposes, it is not possible to establish which programming language is the best. Thus, the programmer must learn any programming language, and then learn other programming languages if necessary. As C++, Java and C# are very similar; the programmer can easily expand his knowledge from one language to another. The table shows how to decide what programming language to use based on the type of application to develop. As you may expect, this table is only a recommendation and you should use your expertise to make a decision. Es común pensar que un programador debería concentrarse en aprender el mejor lenguaje de programación. Como los lenguajes de programación están diseñados para propósitos distintos, no es posible establecer cuál es el mejor lenguaje de programación. Así, el programador debe aprender cualquier lenguaje de programación, y entonces aprender otros lenguajes de programación si es necesario. Como C++, Java y C# son muy similares; el programador puede fácilmente expandir su conocimiento de un lenguaje a otro. La tabla muestra como decidir que lenguaje de programación usar basado el tipo de aplicación a desarrollar. Como usted se debe imaginar, esta tabla es solamente una recomendación y usted debe usar su experiencia para tomar una decisión. |
Hardware Resources |
| It is very important to notice that a program in Java or C# will consume more resources from the computer, including more memory and CPU time than a program written in C or C++. Thus, a program in Java or C# may take longer to respond and to run than a program written in C or C++. Es muy importante notar que un programa en Java o C# consumirá más recursos de la computadora, incluyendo más memoria y más tiempo de CPU que un programa escrito en C o C++. Así, un programa en Java o C# puede tomar más tiempo en responder y ejecutarse que un programa escrito en C o C++. |
Microsoft Universal Application |
| It is an application (created in Microsoft Visual Studio) that can run in a computer running Windows, a portable device running Windows Mobile, and an Xbox console. Using the software Xamarin (that integrates with Microsoft Visual Studio), it is possible to run these applications in iOS, MacOS, and Android. At this point, it is not clear how efficient these applications will run when compared to applications written in C/C++ in native mode. Es una aplicación (creada usando Microsoft Visual Studio) que puede ejecutarse en una computadora con Windows Móvil, un dispositivo portátil con Windows y una consola de Xbox. Usando el software Xamarin (que se integra con Microsoft Visual Studio), es posible ejecutar estas aplicaciones en iOS, MaxOS y Android. En este punto, no es claro que tan eficientes estas aplicaciones correrán cuando se comparen con aplicaciones escritas en C/C++ en modo nativo. |
| Tip |
You may find Java problems in the following sections:
Usted puede encontrar problemas en Java en las secciones siguientes:
|
| Tip |
| The main difference between C++ and Java is that C++ supports Multiple Inheritance and Java supports only Single Inheritance. However, this is not a restriction because in Java a class can implement several interfaces. La diferencia principal entre C++ y Java es que C++ suporta Herencia Múltiple y Java soporta solamente herencia simple. Sin embargo, esto no es una restricción porque en Java una clase puede implementar varias interfaces. |
| Problem 4 |
| Work on teams of four students on the following questions: (a) What is an abstract class? (b) What is a virtual function? (c) What is a virtual pure function? (d) What is an Interface? (e) What programming problem does solve an interface? (f) When do I need to declare an Interface? (g) When do I need to implement an Interface? Trabaje en equipos de cuatro estudiantes en las siguientes preguntas: (a) Que es una clase abstracta? (b) Que es una función virtual? (c) Que es una función virtual pura? (d) Que es una interface? (e) Que problema de programación resuelve una interface? (f) Cuando necesito declarar una Interface? (g) Cuando debo implementar una interface? |